Terraforming a Ghost blog with Docker Compose and Cloudflare - PART 1
Learn how to set up a Ghost blog with Commento and serve it behind Cloudflare, all being automated using Terraform, Docker Compose and Digitalocean.
( Photo by Buzz Andersen (opens in new tab) )
When I started setting up this blog (opens in new tab) I decided to begin by using a ready-made Digitalocean droplet. I then started adding other integrations and tools (Mailgun, fail2ban, Commento and so on) and rolled out further worked to harden the configuration. The approach of course is convenient, but it is not repeatable. Right now I have a quite complex installation and it would not be very easy for me to re-deploy it. Granted, I am taking regular backup images on Digitalocean to enable a point in time recovery should the need arise, and recover from there. Still, this is not ideal.
Another aspect of concern is that I am, obviously, about to become famous on a worldwide scale 😆. Right now, my blog sits behind Cloudflare, which would allow it to sustain significant peaks of traffic. Even so, I am using the smallest Droplet available and I may want to change that at some point. Many moons ago (circa 2006) I ran another blog on shared hosting without a CDN in front: I still remember that time when it buckled completely under a surge of traffic caused by a backlink from a Digg (opens in new tab) popularity leaderboard!
Testing is also important: wouldn’t it be nice to be able to stand up a complete throwaway replica of my production environment for playing any experimentation - without fear of causing live issues?
What about modularization? Right now I’m able to run all the services on a single droplet. In the future, I want to move the database to its droplet. Or even to a different public cloud provider / SaaS offer.
In this blog article, we will see how we can obtain a configuration that covers most of the above concerns and requirements, using mainly Terraform and Docker Compose. We will start from scratch and see the process end to end. This is part one.
Prerequisites
To run this tutorial, you will need the following:
- A domain name
- A Digitalocean account (opens in new tab) (Disclosure #1: I’m part of their referral program (opens in new tab) and I may earn credits if you sign up using this link)
- A Cloudflare account (opens in new tab), Free account is enough for this.
You will also need to install the following tools on your environment
- Terraform CLI (opens in new tab): version must be greater or equal to 0.13
ℹ️ The code of this tutorial is open source and available here (opens in new tab), I recommend that you clone the repository and follow my article.
git clone git@github.com:Vortexmind/terraforming-ghost.gitOur objective
At the end of this tutorial, we want to have the following set up:
- One Digitalocean droplet in a region of choice.
- A running instance of Ghost blog, Commento and their respective databases (MySQL for Ghost, Postgres for Commento). These components will be orchestrated by Docker Compose.
- A Cloudflare setup standing in front of the above infrastructure. The connections between the clients and Cloudflare will be encrypted (HTTPS), while the connection between Cloudflare to the droplets will be unencrypted HTTP (for now).
- A Droplet Firewall configured to accept incoming SSH connections from anywhere, and HTTP connections only from Cloudflare’s IP address space.
- The setup and deployment of all the above will be automated using Terraform.
⚡ Note : I have removed the HTTPS requirement on the traffic between Cloudflare and Digitalocean purely to reduce the scope of this this tutorial, and not because it is a best practice.
💡 To the contrary, I recommend encrypting all the traffic between the client and the Digitalocean origin. I will show you how to easily do this in the next article. Stay tuned!
Architecture
Here’s a handy diagram recapping what we want to achieve in this
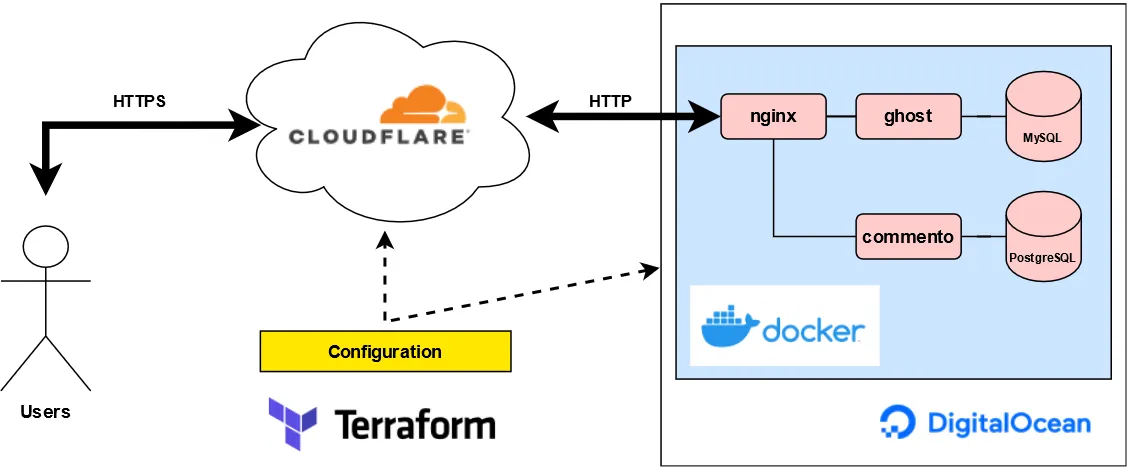
High Level Diagram
Implementation
Firstly, we checkout the project code and we open the new project folder.
$ git clone git@github.com:Vortexmind/terraforming-ghost.gitLet’s check that we have the terraform-cli correctly installed on our system, note version greater than 0.13. If you don’t have it, head here for the documentation (opens in new tab).
$ terraform -v
Terraform v0.13.4
Here’s the tree structure of our project. Do note that some of the files you see will not be available yet in your freshly checked out version, but we’ll get to it shortly.
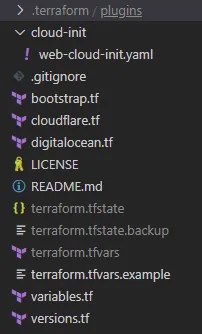
terraforming-ghost project
The .tf files are Terraform’s declarative configuration files. They describe to Terraform the infrastructure that we want to deploy. For convenience, I have split them in different modules:
versions.tftells Terraform which Providers (opens in new tab) we will need to deploy our project. A Terraform provider is responsible for knowing which resources and data sources can be manipulated by Terraform and knows how to talk to each provider to get the data and deploy the resources. For our project, we needcloudflareanddigitalocean.variables.tfdeclares a list of Terraform variables that will use in our configuration. These variables can have default values and can be set by the user that wishes to use this template in theterraform.tfvarsfile. Typically, you would not check interraform.tfvarsin source control as it might contain confidential data or API keys. I have provided aterraform.tfvars.examplefile instead which lists the one that you will need to define in yourterraform.tfvarsfor this to work.bootstrap.tfis a convenience module which initializes the providers, passing the required parameters (such as their version, or the keys and tokens needed by them to communicate with your resources)cloudflare.tfdefines the resources we want to implement in Cloudflare, anddigitalocean.tfdefines similarly for Digitalocean.
We also see a folder containing a web-cloud-init.yaml file. This is a template file (a Cloud-Init (opens in new tab) configuration file) and we will use it to bootstrap the required software and resources on the Digitalocean Droplet that we will spin up. Notably, it includes some template variables: these will be substituted on the fly by Terraform with actual configuration values when provisioning. This is a handy method to avoid leaking any secrets directly inside your configuration files.
Digitalocean - Terraform setup
If we look more closely at digitalocean.tf , we can see that we are declaring a digitalocean_project resource. We use it to keep our Digitalocean configuration tidy and separate from other resources:
resource "digitalocean_project" "ghost-terraform" {
  name        = "ghost-terraform"
  description = "A Ghost blog with Commento, using Terraform and docker-compose"
  purpose     = "Web Application"
  environment = "Production"
  resources = [digitalocean_droplet.web.urn]
}
We then declare a digitalocean_ssh_key data source - to be used for connecting securely to our droplet:
data "digitalocean_ssh_key" "default" {
  name       = var.digitalocean_key_name
}
More importantly, we define our droplet:
resource "digitalocean_droplet" "web" {
  image  = var.digitalocean_droplet_image
  name   = "terraforming-ghost-droplet"
  region = var.digitalocean_droplet_region
  size   = var.digitalocean_droplet_size
  ssh_keys = [
    data.digitalocean_ssh_key.default.id
  ]
  user_data = templatefile("${path.module}/cloud-init/web-cloud-init.yaml", {
    "PWD" = "$${PWD}",
    "mysql_user" = var.mysql_user,
    "mysql_password" = var.mysql_password,
    "postgres_user" = var.postgres_user,
    "postgres_password" = var.postgres_password,
    "ghost_blog_dns" = var.ghost_blog_dns,
    "commento_dns" = var.commento_dns,
    "static_dns" = var.static_dns,
    "digitalocean_user" = var.digitalocean_user
  })

  connection {
      user  = "root"
      type  = "ssh"
      host  = self.ipv4_address
      private_key = file(var.digitalocean_priv_key_path)
      timeout = "10m"
  }
}
Let’s see what’s going on here:
- We define the usual bootstrapping parameters: which image we want to use, which region to deploy in, what is the computing power of the droplet. All of these are parametrised from variables and will be defined from what we set in
terraform.tfvars - We then associate our
digitalocean_ssh_keywith this droplet, so that Terraform knows we want to use it for connection with this particular resource. - In the
user_dataparameter, we pass our Cloud-Initweb-cloud-init.yamlfile into thetemplatefilefunction, and we list which template variables we want to substitute. This is a neat way to ensure that the configuration files can be version controlled while ensuring that the confidential values of these variables remain on your machine (or in a secrets storage solution used within your build environment). Once the Droplet boots in Digitalocean, it will use the commands and directives we specify in this file to apply additional changes. - Lastly, in the
connectionsection, we describe how Terraform can connect to the droplet to deploy theuser_data. Here we are specifying an ssh connection using the private key associated with the identity we have configured just earlier.
We also have another section defining a digitalocean_firewall which will control who can connect to our droplet.
If you remember from our diagram, we want to accept incoming HTTP connections from Cloudflare only. For that, we need to know the Cloudflare IP ranges, which can be easily retrieved from the cloudflare provider using the cloudflare_ip_ranges data source available:
data "cloudflare_ip_ranges" "cloudflare" {}Next, we define our firewall, associate it to the droplet and define the traffic rules.
- We allow inbound TCP/22, ICMP and TCP/80
- We allow all outbound ICMP,TCP and UDP traffic
In the inbound TCP/80 , we specify which source addresses are allowed:
  inbound_rule {
    protocol    = "tcp"
    port_range  = "80"
    source_addresses = data.cloudflare_ip_ranges.cloudflare.cidr_blocks
  }
Very handy - we don’t need to look up or manually list any of these as Terraform will retrieve them transparently from the Cloudflare API as needed.
Cloudflare - Terraform setup
On the Cloudflare side - the configuration is quite simple.
Firstly, we define a data resource so that we can dynamically retrieve the Cloudflare zone_id based on the zone (or domain) that we have configured:
data "cloudflare_zones" "ghost_domain_zones" {
  filter {
    name   = var.cloudflare_domain
    status = "active"
  }
}
This data source uses the Cloudflare API to lookup all the active zones for our domain, filtered by name. We of course expect to find only one result here, our domain/zone.
We then define three DNS A records, one for each of the HTTP endpoints we want to expose to the world (Commento, Ghost, and a static server we will run off nginx). Let’s see one example (the Ghost blog record):
resource "cloudflare_record" "ghost_blog_record" {
  zone_id = lookup(data.cloudflare_zones.ghost_domain_zones.zones[0], "id")
  type    = "A"
  name    = var.ghost_blog_dns
  value   = data.digitalocean_droplet.web.ipv4_address
  ttl     = "300"
  proxied = true
 }
Specifically:
- We use the data source to lookup the
zone_idfor our domain, which is needed by the API to create the DNS rule. - The
nameof the zone will be configurable. - In the
valuesetting, we are telling the A record to point at the IP address of the droplet we just created (data.digitalocean_droplet.web.ipv4_address). Terraform will take care of executing the configuration in the right order so that the Cloudflare configuration will be executed only when it knows the actual public IP of the droplet that we have defined earlier.
Finally, we also use the settings resource to enforce some configuration for our zone. For example, we want to always use HTTPS (on the edge), enable Brotli compression and auto minify the static resources. We will review more for this in the future.
resource "cloudflare_zone_settings_override" "ghost_zone_settings" {
    zone_id = lookup(data.cloudflare_zones.ghost_domain_zones.zones[0], "id")
    settings {
        always_use_https = "on"
        brotli = "on"
        minify {
            css = "on"
            js = "on"
            html = "on"
        }
    }
}
Terraform Variables
To configure this, we need to provide the configuration variables. The actual values need to be specified in terraform.tfvars , but I have provided a terraform.tfvars.example file with all the needed values, for you to populate:
digitalocean_token = ""
digitalocean_droplet_image = "docker-20-04"
digitalocean_droplet_region = "lon1"
digitalocean_droplet_size = "s-1vcpu-1gb"
digitalocean_key_name = ""
digitalocean_priv_key_path = ""
cloudflare_email = ""
cloudflare_api_key = ""
cloudflare_domain = ""
ghost_blog_dns = ""
commento_dns = ""
static_dns = ""
mysql_user = ""
mysql_password = ""
postgres_user = ""
postgres_password = ""
Let’s recap:
digitalocean_tokenis an API token required by the Digitalocean Terraform provider. Grab yours here (opens in new tab).- The next 3 values define the image, region and size for the Droplet. I used
docker-20-04as it comes with Docker and docker-compose pre-installed. Region and size, up to you (I’m using London region and the smallest droplet size) digitalocean_key_nameis the name of the Digitalocean Key that you have configured in your account and which you want to use for this tutorial. If you haven’t one, follow the documentation here (opens in new tab) and then here (opens in new tab) (you want to use the same name as in your Digitalocean Dashboard)digitalocean_priv_key_pathpoints to the private key half stored on your machine. It is needed by Terraform to connect with your droplet.cloudflare_emailandcloudflare_api_keyare used by the Cloudflare Terraform provider. The first is your Cloudflare account e-mail, the other can be found here (opens in new tab) (Global API Key)ghost_blog_dns,commento_dnsandstatic_dnsare the subdomains associated with the DNS A rules which will be used. These will be the public-facing addresses of your blog, your commento instance and the static webserver.- The last values are the MySQL and Postgres instances username and passwords.
Make a copy of this file in terraform.tfvars and complete it.
Cloud-Init configuration
Lastly - let’s have a look at the Cloud-Init configuration file web-cloud-init.yaml. All the documentation is also available here for reference (opens in new tab).
#cloud-config

package_update: true
package_upgrade: true
package_reboot_if_required: true
In the first section, we want our Droplet to immediately check for updated packages and issue an upgrade. We also want our droplet to reboot if some of these upgrades require to do so.
packages:
  - curl
In this section, we can list some packages that we want to install. I have put curl as an example.
We then have a series of write_files declarations, each one specifying a location for a file path and its content. This directive will allow us to create and deploy configuration files at specified locations.
The first file we create is deployed at /opt/scripts/docker-compose.yml and is, as the name suggests, a Docker Compose template. In here we are describing the containers we need for our installation, mapping the required configuration files, volumes and passing the configuration variables such as the MySQL username and passwords.
💡 It is worth considering that the actual passwords and values will be visible in the files we are creating here. Something to consider when adopting this approach in a multi-user environment.
The Docker Compose template should be pretty self-explanatory, and in fact, I will be refining this topic in a further episode, so I won’t spend too much time here.
We then define our nginx configuration files for our required HTTP endpoints (ghost, commento and static server). This is also a fairly standard Nginx configuration. We will work more on this to make this setup fully secured with HTTPS in the next article.
Finally, we have a runcmd section
runcmd:
  - docker pull registry.gitlab.com/commento/commento:v1.8.0
  - cd /opt/scripts
  - docker-compose up -d
These are the commands that Cloud-Init will execute at the end of the process, after the package upgrades (and then reboot if needed). Here we are pulling the Commento docker image from the Docker Registry, we then enter the folder with our configurations and issue the docker-compose command needed to stand up our containers and start accepting incoming traffic.
⚡ To be noted, as soon as the containers stand up successfully, your ghost and commento instances will be available publicly at the configured subdomains. This means that technically anyone fast enough can, for example, create an admin account for Commento. We will also address this aspect in the future.
Deploying with Terraform
We are almost there! So, you have created all the tokens and configured all the variables. Now, you should have your project folder with the terraform.tfvars file ready to go.
All we need to do now is to bootstrap Terraform on our machine and let it do all the hard work.
The first step is to initialize Terraform
$ terraform initThis command will initialize the Terraform backend and download the version of the Terraform providers that we declared.
Once this has completed, the next command to issue is
$ terraform planwhich will look at all the configuration files we discussed above and determine if it can create a deployment plan to create such resources. Typically, if you have misconfigured some values in your terraform.tfvars file, or perhaps changed the other Terraform modules, this is where you would see errors.
If all is OK, you will see an execution plan describing what Terraform wants to deploy on your behalf. You should see all the resources we have defined earlier. You can review the plan and confirm that everything looks in order. When you are happy with that, issue a
$ terraform applyThis will show the plan again, and ask for confirmation. Once you provide it (it will only take yes for an answer 😀 ) Terraform will start provisioning the resources automatically.
There might be other errors happening here at this stage. For example, wrong credentials and/or insufficient permissions. In case of problems, you can increase the verbosity of terraform by issuing
$ export TF_LOG=TRACEin your terminal. This will give you a lot of verbose logging from all the API calls that are made by Terraform and can help you troubleshoot your issue.
If everything goes well you will see a completion message. Please note however that your Digitalocean Droplet may be busy with updates, downloading docker images and so on before your software stack is up and running and available at the specified subdomain. My suggestion is to connect to your droplet
$ ssh -i <PATH TO YOUR PRIVATE KEY> root@<DROPLET IP>and watch for the cloud-init-output log file available in /var/log. If something goes wrong with cloud-init, that’s where you can troubleshoot it. It took me some trial and error to get to a fully repeatable, basic setup as seen in my repository.
Let’s say you have now done your tests and want to tear up this environment and stop paying for the droplet. In that case, issue a
$ terraform destroycommand and all the resources you created (droplet, Cloudflare rules etc…) will be removed. Congratulations on getting to the bottom of this!
I hope you enjoyed this article. In the future, I want to expand this more, looking in particular at:
- PART 2 - Securing the connection between Cloudflare and the Droplet (opens in new tab).
- PART 3 - Data persistence with Digitalocean Volumes (opens in new tab)
- Installing other integrations such as Mailgun etc…
Until then, happy hacking!